1. The Ultimate n8n Self-Hosting Guide: Owning Your Automation Strategy in 2026
This n8n self-hosting guide reveals why taking control of your automation in 2026 is essential for any thriving digital enterprise, rather than just an optional perk. Historically, businesses depended on costly cloud-based tools where every triggered workflow quietly drained their budget. Those hidden “per-task” charges aggressively inflated costs as companies grew.
Bringing your workflows in-house provides the absolute control necessary to scale globally without financial friction. To discover how modern enterprises are revolutionizing their processes, explore our resource on utilizing expert n8n automation services to maximize your operational efficiency.
But the landscape has changed dramatically. The rapid rise of n8n, a powerful fair-code workflow automation engine, is giving control back to developers, marketers, and agency owners. Today, self-hosting n8n is no longer limited to hardcore system administrators; it has become one of the smartest financial and technical decisions for building a scalable and independent automation stack.
Why the Massive Shift to Self-Hosting?
- Zero Execution Limits: Stop worrying about burning through your monthly quota just because an affiliate campaign went viral.
- Total Data Sovereignty: Your sensitive customer data never leaves your server, making privacy compliance incredibly simple.
- Limitless Scalability: You own the engine. Need more processing power? You just upgrade your server hardware, not your software tier.
The Pros and Cons of the Self-Hosted Route
- Pros: Fixed monthly costs (often under $10), complete control over your environment, and the unhindered ability to run heavy AI-driven workflows without frustrating timeout errors.
- Cons: There is a slight learning curve. You are responsible for your own server updates and security. (But do not worry, we cover the exact “Fortress” security setup in Step 12).
The Chain Process in Action
Think of your self-hosted n8n as the ultimate digital switchboard. Here is a simple example of the chain process we are building towards in this guide:
- A new user submits a lead form on your WordPress site (using Spectra blocks, perhaps).
- n8n catches the webhook instantly.
- An internal AI node formats and cleans the data.
- n8n pushes the clean data into your PostgreSQL database.
- A Slack alert hits your phone confirming the successful capture.
You control every single node, and it costs you absolutely nothing extra to run it a million times.
2. n8n vs Zapier vs Make: The Ultimate Automation Showdown
When you step into the automation ring in 2026, you usually face three heavyweights: Zapier, Make (formerly Integromat), and n8n. If your goal is to maximize your ad revenue and affiliate marketing profits, you have to know exactly where your operating budget is going. Let’s break down the ultimate showdown so you can see why the industry is shifting.
While this guide focuses on self-hosting, it is crucial to understand the broader market. For a deep dive into how n8n stacks up against the biggest commercial players, read our complete, unbiased breakdown of n8n vs Zapier vs Make for 2026.
Zapier is the grandfather of automation. It connects to everything, but it charges a massive premium for that simplicity. Make offers a beautiful visual canvas and slightly cheaper entry tiers, but you are still playing by their strict SaaS rules. n8n flips the script entirely by giving you the keys to the underlying engine.
The Pros and Cons of the Big Three
- Zapier: Pros: Insanely easy setup and a massive app directory. Cons: Brutally expensive. Complex, multi-step workflows will eat your monthly profit margins alive.
- Make.com: Pros: Intuitive visual routing and better pricing than Zapier. Cons: You still face execution limits. When a workflow loops through heavy arrays of data, your “operations” count drains fast.
- n8n: Pros: Infinite executions, deep technical control, and zero “per-task” fees. Cons: You have to set it up yourself on a server (which is exactly what this guide solves for you).
The Chain Process Comparison
Let’s look at a realistic 5-step chain process for a fast-loading tech blog running on Astra and Spectra:
- A new high-paying affiliate offer drops in your Gmail inbox.
- The automation reads the email and pushes the raw text to an AI node.
- The AI drafts a perfectly formatted, SEO-optimized promotional post.
- The content is published directly to cstechy.com via the WordPress API.
- A webhook triggers a social media broadcast to Twitter and LinkedIn.
On Zapier, running that 5-step sequence 1,000 times a month will cost you a small fortune in “Task” credits. On a self-hosted n8n setup, it costs you absolutely nothing beyond your flat VPS hosting fee. The math speaks for itself.
3. n8n Cloud vs. Self-Hosted: How to Escape the “Per-Task” Pricing Trap
let’s talk about the biggest trap in the automation world right now. When you first discover n8n, the official Cloud version looks incredibly tempting. You just sign up, log in, and start building. But if you are scaling a serious tech blog and pushing heavy affiliate marketing campaigns, that convenience comes with a massive hidden cost. We call it the “per-task” pricing trap.
In the cloud environment, you are essentially renting computing power by the execution. Every time a webhook fires, a database updates, or an email sends, the meter is running. Self-hosting completely destroys this meter, turning your recurring expenses into pure profit margins.
The Pros and Cons of Cloud vs. Self-Hosted
- n8n Cloud: Pros: Zero server setup, managed security, and instant access to the canvas. Cons: You hit execution limits quickly. If a viral post spikes your traffic and triggers thousands of lead capture events, you are forced into a much more expensive monthly tier.
- Self-Hosted n8n: Pros: You pay a flat, predictable fee for your VPS. You get unlimited executions, total data control, and the ability to allocate server RAM directly to heavy scraping tasks. Cons: You have to handle the initial Docker installation and occasional version updates yourself.
The Chain Process: Why Executions Matter
Imagine running an automated SEO health check across a massive site. Here is a high-volume chain process that would drain a cloud plan in days:
- A scheduled Cron node triggers the workflow every Sunday at midnight.
- An HTTP node crawls all 500 published articles on your domain to check for broken affiliate links or 404 errors.
- A custom script node extracts the exact URLs of any failing links.
- n8n cross-references these links against your live toxic backlink disavow data.
- The final, clean list of errors is pushed into a dedicated Telegram or Slack channel for immediate fixing.
On a self-hosted VPS, running that massive 500-page crawl costs you zero extra dollars. You escape the SaaS trap and keep your affiliate revenue exactly where it belongs.
4. What Can I Use a VPS For? Unlocking Infinite Workflow Executions
If you are new to the server game, you might be asking yourself a very fundamental question: what can I use a VPS for? A Virtual Private Server is essentially your own dedicated slice of a massive cloud computer. When you buy basic shared hosting, you are cramped in a digital apartment building, fighting for resources with thousands of other websites. A VPS gives you your own private estate, complete with dedicated RAM, CPU threads, and full root access.
If you are new to server management and wondering about the sheer power you are unlocking for your international projects, we have a dedicated resource covering 12 powerful uses for a Virtual Private Server beyond just hosting n8n.
ll root access.For a technical marketer or an automation engineer, a VPS is the holy grail. It is the engine that unlocks infinite n8n workflow executions. But the power doesn’t stop there. Because you have complete control over the operating system (usually Ubuntu), you can use a single, well-optimized VPS instance to run your entire digital empire simultaneously.
The Pros and Cons of Running a VPS
- The Multi-Tool VPS: Pros: Absolute technical freedom. You can install Docker to run n8n, host a blazing-fast WordPress tech blog optimized with server-level caching, and deploy custom Python SEO scrapers—all on the exact same machine. It is the ultimate consolidation of your monthly expenses. Cons: You are the sysadmin. There is no customer support rep to hold your hand if you accidentally delete a core system file. You must rely on automated backups and good server hygiene.
The Chain Process: A Full-Stack VPS Automation
Let’s look at a multi-app chain process that proves why a VPS is the ultimate asset for generating hands-free affiliate income:
- Your VPS reliably runs n8n in an isolated Docker container right alongside your live website database.
- A scheduled n8n node triggers an aggressive web scraper to pull trending hosting deals and coupon codes.
- The workflow routes this raw data through an AI node to synthesize a highly structured, readable product review.
- n8n formats the text, injects your specific affiliate tracking links, and publishes the post instantly via the WordPress REST API.
- Your server-side caching engine detects the new post and automatically preloads it, guaranteeing an elite PageSpeed score the second a user clicks from Google.
By leveraging a VPS, you aren’t just automating tasks; you are building an unstoppable, self-contained media machine.
5. n8n Self Hosting Guide: When Should I Upgrade From Shared Hosting to VPS Hosting?
One of the most common questions beginners ask when diving into this n8n self hosting guide is exactly when should I upgrade from shared hosting to VPS hosting? It is a crucial technical milestone. If you are running a fast-loading tech blog on a standard shared plan, you might be enjoying decent uptime. But the moment you try to run complex, background server applications like n8n or heavy Node.js environments, shared hosting completely falls apart.
Shared hosting simply cannot handle intensive webhook data and heavy automation logic. If your site is experiencing bottlenecks, it might be time to read our expert advice on exactly when you should upgrade from shared hosting to a VPS environment.
Shared hosting is designed strictly for serving web pages. It actively kills long-running background processes to protect the other users on the server. If you want to build automated workflows that run 24/7 without timing out, moving to a VPS is non-negotiable.
The Pros and Cons: Shared vs. VPS for Automation
- Shared Hosting: Pros: Very cheap and easy for basic WordPress sites built with Astra and Spectra. Cons: Absolutely zero Docker support and strict RAM limits. It will instantly crash any n8n instance.
- VPS Hosting: Pros: Full root access. You can configure LiteSpeed Cache with UCSS and VPI for perfect Google PageSpeed scores on your frontend, while n8n runs flawlessly in an isolated backend Docker container. Cons: Requires you to follow a proper n8n self hosting guide to secure the environment.
The Chain Process: The Upgrade Trigger
Here is the exact chain process where a shared server fails and a VPS shines, signaling it is time to upgrade:
- A user clicks your affiliate link and generates a high-ticket sale, sending a webhook to your domain.
- n8n attempts to catch this JSON payload to update your AdSense and affiliate revenue dashboard.
- On shared hosting, the RAM spikes, the server kills the process, and the webhook data is lost forever.
- On a VPS, your dedicated RAM easily absorbs the spike, processing the payload instantly.
- The workflow successfully logs the sale and triggers a celebratory Slack notification, completely uninterrupted.
If you are losing data or your background tasks keep failing, that is exactly when should I upgrade from shared hosting to VPS hosting.
6. n8n Self Hosting Guide: The Best n8n Hosting Providers for 2026 (Global Top Picks)
Navigating the massive server market can be incredibly overwhelming. A critical pillar of any definitive n8n self hosting guide is revealing the absolute best n8n hosting providers for 2026 so you do not waste money on underpowered rigs. Whether you are running a high-traffic tech blog monetized heavily with AdSense or managing complex affiliate marketing data pipelines, your VPS needs serious muscle.
Selecting the right infrastructure is the most critical step for your global command center. We have tested the market leaders to bring you our definitive ranking of the best n8n hosting providers for 2026 to guarantee maximum uptime.
You cannot run professional workflow automation on a potato. We are talking high-clock CPUs, dedicated RAM, and lightning-fast NVMe storage to handle thousands of concurrent PostgreSQL database queries without breaking a sweat. When your tech stack is optimized, your server acts as an invisible money-making machine.
The Pros and Cons: Premium vs. Ultra-Budget Hosts
- Premium VPS (e.g., Hostinger/Bluehost): Pros: Incredible global data center locations, ensuring low-latency webhooks globally. They handle heavy Docker containers with ease, leaving plenty of juice to serve your WordPress site flawlessly. Cons: You are paying for raw performance, which might be overkill if you are only running one simple cron job a week.
- Ultra-Budget Hosts: Pros: Dirt cheap entry price for testing. Cons: They often use older hardware (SATA SSDs) and aggressive resource throttling, which frequently causes “Database is locked” errors in n8n when multiple workflows fire simultaneously.
The Chain Process: Deploying on a Top Provider
Here is the exact chain process of how selecting a top-tier host directly impacts your automation success:
- You identify an aggressive content strategy requiring 10+ active n8n workflows.
- You purchase a KVM-virtualized VPS from our recommended list to guarantee hardware-level isolation.
- You point a secure subdomain (like automate.cstechy.com) to your new high-speed server IP.
- Docker Compose pulls the latest n8n image and boots up a dedicated database in seconds.
- Your server seamlessly processes massive JSON payloads 24/7 without slowing down your front-end visitors or impacting your core PageSpeed metrics.
By locking in one of the best providers, you guarantee your n8n self hosting guide setup remains rock-solid as you scale your traffic.
7. n8n Self Hosting Guide: The Showdown: Bluehost vs. Hostinger VPS: Which is Better for n8n Automation?
If you are serious about building a highly profitable tech stack, you eventually have to answer the ultimate question in this n8n self hosting guide: when it comes to Bluehost vs. Hostinger VPS: Which is better for n8n automation? Both of these giants offer incredible affiliate marketing potential, but they handle heavy backend applications differently. You need a server with high RAM, fast NVMe SSDs, and stable KVM virtualization to keep your Docker containers running 24/7 without crashing.
These two titans dominate the entry-level server market worldwide. To see which one truly wins for automation workloads, check out our head-to-head performance test in this Bluehost vs Hostinger VPS comparison.
Hostinger brings aggressive pricing and incredible global data centers, which is perfect for keeping latency low when international webhooks fire. Bluehost brings raw, managed NVMe power and rock-solid stability, which is an absolute lifesaver when you are processing massive arrays of JSON data and need your PostgreSQL database to perform flawlessly.
The Pros and Cons: Hostinger vs. Bluehost
- Hostinger VPS: Pros: Unbeatable price-to-performance ratio. Their KVM 2 plan offers 8GB of RAM, easily handling n8n “Queue Mode” while running a high-traffic Astra-themed site on the side. Cons: You are fully responsible for the command line setup, which can be daunting for absolute server beginners.
- Bluehost VPS: Pros: Premium NVMe storage means your n8n database queries execute in milliseconds, preventing timeout errors during heavy data scraping. Cons: Higher renewal costs, which you must factor into your monthly AdSense and affiliate revenue margins.
The Chain Process: Server Choice in Action
Let’s look at how your server choice impacts a real-world affiliate tracking chain process:
- A high-ticket affiliate sale triggers a massive JSON payload from your partner network.
- The webhook hits your VPS. Hostinger’s global routing ensures the payload arrives instantly without dropping.
- n8n processes the raw data, initiating a heavy database write. Bluehost’s NVMe drives swallow the write-operations flawlessly without locking up.
- The workflow successfully calculates your updated monthly revenue across all your tech blog domains.
- A clean, formatted financial report is pushed directly into your private Slack channel for passive monitoring.
Both hosts are titans. Your choice in this n8n self hosting guide depends entirely on whether you prioritize budget scaling or managed NVMe power.
8. n8n Self Hosting Guide: The Cloudways Angle: Cloudways vs. Self-Managed VPS for Heavy Workloads
As your tech blog scales and your pillar pages start dominating the search results, your backend traffic is going to explode. A core component of any complete n8n self hosting guide is knowing when to shift from a bare-metal server to a managed cloud infrastructure. This brings us to the ultimate debate: Cloudways vs. Self-Managed VPS for n8n when dealing with exceptionally heavy workloads.
Do you want full root access, or do you prefer a managed panel to save time? Find out which route yields the best performance for your workflows in our deep dive on Cloudways vs Self-Managed VPS hosting.
When a viral cluster post drives thousands of simultaneous users to your site, your server has to serve cached pages instantly while simultaneously processing massive JSON payloads through n8n in the background. A self-managed VPS requires you to manually monitor and optimize these resource spikes. Cloudways, acting as a managed layer over top-tier cloud providers like DigitalOcean or AWS, offers an entirely different, hands-off scaling experience.
The Pros and Cons: Cloudways vs. Self-Managed VPS
- Cloudways (Managed Cloud): Pros: Vertical scaling with a single click. If your n8n workflows hit a memory limit during a heavy API scrape, you just slide a bar to double your RAM without complex server migrations. It also features incredible built-in caching. Cons: It costs significantly more than a raw VPS, eating into your monthly AdSense profits, and restricts some deep root-level Docker configurations.
- Self-Managed VPS: Pros: Unrestricted technical freedom and massive cost savings. You configure the exact environment n8n needs. Cons: You are the sole line of defense if a memory leak crashes your database.
The Chain Process: Scaling During a Traffic Spike
Here is exactly how this plays out during a massive workload event:
- Your new affiliate marketing guide ranks #1, driving a massive spike in concurrent visitors.
- Hundreds of users click your links, triggering rapid-fire webhooks back to your n8n instance for tracking.
- On a self-managed VPS, if RAM isn’t perfectly allocated with Swap files, the server might choke and drop webhook data.
- On Cloudways, server health monitors alert you instantly, allowing you to seamlessly scale up resources from the dashboard.
- n8n continues to process the heavy queue flawlessly, ensuring every single lead and commission is logged securely.
Incorporating this strategy into your n8n self hosting guide setup ensures your infrastructure never bottlenecks your revenue.
9. n8n Self Hosting Guide: The Budget Angle – Milesweb vs. Namecheap for Global Teams
When you are bootstrapping a tech blog and fighting to maximize your AdSense and affiliate marketing ROI, every single dollar matters. That is why a truly comprehensive n8n self hosting guide must cover the absolute best budget-friendly server options. If you are managing remote writers or building a global team, you need a server that is cheap but still packs enough punch to handle the basic Docker capabilities required to run n8n flawlessly.
If keeping overhead low without sacrificing global server speed is your goal, we put two major budget-friendly contenders to the test. See the clear winner in our honest verdict on MilesWeb vs Namecheap VPS for n8n hosting.
Let’s break down Milesweb vs. Namecheap: The Best Budget VPS for Global Teams. Both of these providers offer entry-level Virtual Private Servers that cost less than a cup of coffee per month. They are the perfect sandbox environments to get your very first automated workflows off the ground without burning through your capital.
The Pros and Cons: Milesweb vs. Namecheap
- Milesweb VPS: Pros: Incredible pricing, especially for Asian and Indian server locations, offering surprisingly good RAM allocations on their starter tiers to keep n8n’s Node.js engine running smoothly. Cons: Customer support response times for unmanaged servers can be slower compared to premium tier hosts if your PostgreSQL database happens to crash.
- Namecheap VPS: Pros: An extremely reliable global brand with a very clean, user-friendly dashboard for beginners provisioning their very first Ubuntu instance. Cons: Base NVMe storage is sometimes limited on the cheapest tiers, meaning you have to monitor your n8n execution log sizes carefully so they don’t fill up your disk.
The Chain Process: Budget Automation for Teams
Here is how a budget server empowers a global content team:
- You provision a $6/month budget VPS and install n8n using standard Docker Compose.
- Your remote content writers log into the n8n canvas using secure, role-based credentials.
- A freelance writer submits a new draft for your site via a simple Google Form.
- n8n catches the webhook, uses an AI node to instantly check the text for SEO keyword density, and pings your Slack.
- You click “Approve” in Slack, and the workflow automatically formats and publishes the post to your WordPress site.
For an entry-level n8n self hosting guide setup, these budget options are the ultimate proving ground before you scale up your operations.
10. n8n Self Hosting Guide: Command Center Prep – How to Connect to Your VPS
Once you have secured your high-performance server from Hostinger or Bluehost, the next critical phase in this complete n8n self hosting guide is physically accessing the machine. If you are a beginner, staring at the black screen of a terminal can feel intimidating. But knowing exactly how to connect to your vps is your gateway to absolute technical freedom. You are stepping into the command center.
This is where you will deploy Docker, configure your firewall, and launch the automated workflows that will drive massive affiliate revenue for cstechy.com. You have two main ways to enter your server: using a native SSH client on your computer, or relying on the web-based console provided by your hosting company. Let’s break down the smartest approach.
The Pros and Cons: Native SSH vs. Web Consoles
- Native SSH (Terminal/PowerShell): Pros: Blazing fast, highly secure, and allows you to instantly copy and paste massive Docker Compose scripts without formatting errors. Cons: You need to generate and configure SSH keys if you want to lock the server down completely from brute-force bot attacks.
- Web-Based Host Consoles: Pros: Requires zero local software; it is a lifesaver if you accidentally lock yourself out of your firewall and need an emergency reboot. Cons: The interface is often clunky, keystrokes can lag, and pasting long code blocks is notoriously buggy.
The Chain Process: Establishing the Connection
Here is the exact chain process for establishing a secure, rock-solid connection to your new automation engine:
- Open the native Terminal app on your Mac/Linux machine, or Windows PowerShell.
- Execute the standard connection command:
ssh root@your_server_ip. - Accept the server’s ECDSA key fingerprint to verify you are connecting to the correct host.
- Enter your root password (or authenticate instantly if you have an SSH key pair configured).
- Run
apt update && apt upgrade -yto instantly refresh your Ubuntu package lists before installing n8n.
Mastering this connection prep is a non-negotiable step in our n8n self hosting guide. Once you are in, the server is yours to command.
11. n8n Self Hosting Guide: Windows Users – How to Connect to VPS on Windows 10 Seamlessly
let’s address a massive chunk of the tech community right now. If you are following this complete n8n self hosting guide but you are not on a Mac or Linux machine, you might feel a bit left out of the native terminal party. A very common technical hurdle is figuring out exactly how to connect to vps on windows 10. For years, Windows developers had to rely on clunky, third-party desktop tools just to get a secure line to their servers. But the Microsoft ecosystem has evolved dramatically.
You no longer need to download archaic software to access your high-performance hosting environment. Windows 10 (and Windows 11) now features native OpenSSH support baked right into PowerShell and the modern Windows Terminal. This means you can launch your command center, manage your root access, and start deploying your n8n Docker containers just as fast and securely as any veteran Linux sysadmin.
The Pros and Cons: Native PowerShell vs. PuTTY
- Native Windows Terminal: Pros: It is already installed on your machine. It allows for seamless copy-pasting of long YAML configuration files without the weird formatting glitches that break Docker setups. Cons: You need to be comfortable typing basic command-line syntax instead of relying on a graphical user interface.
- PuTTY (Third-Party App): Pros: Great for saving multiple IP profiles if you manage dozens of different servers for an automation agency. Cons: The interface is severely outdated, and converting standard SSH keys requires a separate “PuTTYgen” tool, which needlessly overcomplicates your workflow setup.
The Chain Process: Connecting on a PC
Here is the exact chain process to jump from your Windows desktop straight into your Ubuntu VPS:
- Click your Windows Start Menu and search for “PowerShell” (or “Windows Terminal”).
- Type the native connection command:
ssh root@your_server_ipand hit Enter. - If this is your first time logging in, type “yes” to permanently accept the server’s ECDSA security fingerprint.
- Enter your root password. (Pro tip: the cursor will not move while you type—this is a built-in Linux security feature, so just type it and hit Enter).
- Boom! You are successfully logged into your Ubuntu server, ready to execute the next phase of this n8n self hosting guide.
Once you master this simple connection process, your operating system no longer limits your ability to build a world-class automation stack.
12. n8n Self Hosting Guide: How to Secure Your n8n VPS in 2026: The “Fortress” Manual
The moment your new server goes live, automated botnets will start scanning its IP address for vulnerabilities. A massive part of any responsible n8n self hosting guide is ensuring your infrastructure is virtually impenetrable. You are going to be storing API keys, database credentials, and potentially sensitive customer data inside your automation workflows. Leaving your server exposed with a default password is digital suicide.
A self-hosted automation platform handles sensitive API keys and global customer data. You must lock it down. Read our comprehensive security manual on building a highly secure n8n VPS setup to prevent unauthorized access.
We need to build a “Fortress.” This means disabling root password logins entirely, setting up strict firewall rules, and utilizing intrusion prevention software. By leveraging Ubuntu’s official UFW documentation, creating a secure gateway by generating robust SSH keys, implementing the Fail2Ban framework to block brute-force attacks, and following strict Docker security best practices, your VPS becomes a highly secure vault for your digital business.
The Pros and Cons: Strict Security Protocols
- The “Fortress” Setup: Pros: Complete peace of mind. It stops 99.9% of automated scraping bots and bad actors from even seeing the login prompt of your VPS. Your automation runs securely without malicious interruptions. Cons: If you lose your private SSH key, you permanently lock yourself out of your own server. You must keep your keys backed up in a secure offline location.
The Chain Process: Locking Down the Server
Here is the exact chain process to lock down your VPS before you ever install n8n:
- Generate a secure RSA 4096 or Ed25519 SSH key pair on your local computer.
- Upload the public key to your VPS and permanently disable password-based SSH logins in the
sshd_configfile. - Change your default SSH port from 22 to a random custom port (like 2222) to dodge automated bot scanners.
- Enable the Uncomplicated Firewall (UFW), allowing incoming traffic ONLY on your custom SSH port, Port 80 (HTTP), and Port 443 (HTTPS).
- Install Fail2Ban to automatically ban any IP address that fails to authenticate after 3 attempts.
By implementing this “Fortress” manual into your n8n self hosting guide setup, you guarantee your tech blog’s backend operations remain untouchable.
13. n8n Self Hosting Guide: The Installation Masterclass – Docker Compose vs. Control Panels
We have reached the absolute turning point of this n8n self hosting guide. Your server is locked down like a fortress, and now it is time to deploy the actual automation engine. When it comes to installing n8n, the industry is split down the middle between two deployment strategies: the raw, highly optimized Docker Compose method, and the beginner-friendly Control Panel route (like using OpenClaw or CyberPanel).
Control panels give you a beautiful graphical interface to manage your VPS, often allowing you to install apps with a single click. Docker Compose, on the other hand, requires you to write a simple YAML configuration file in the terminal. While panels are tempting, serious automation engineers deploying scalable databases almost universally prefer the Docker route for its stability, portability, and zero-overhead performance.
The Pros and Cons: Docker vs. Panels
- Docker Compose: Pros: The absolute industry standard. It runs incredibly lean, updates easily, and perfectly isolates your n8n instance from your PostgreSQL database. Cons: You have to be comfortable navigating the command line and editing text files via the terminal.
- Control Panels: Pros: Zero coding required. You get a visual dashboard to monitor your server resources and install apps. Cons: The panel itself eats up valuable RAM and CPU. On a budget VPS, this overhead can starve your actual n8n workflows of the memory they need to process heavy data.
The Chain Process: A Flawless Docker Deployment
Here is the exact chain process for deploying the ultimate Docker stack:
- You SSH into your secured server and install the official Docker Engine.
- You create a dedicated directory and write a
docker-compose.ymlfile. - Inside the file, you define your n8n image, your PostgreSQL database, and your secure environment variables (like passwords).
- You execute the command
docker-compose up -din your terminal. - Docker pulls the files and seamlessly boots up your entire automation stack in the background within seconds.
Mastering this deployment strategy makes your n8n self hosting guide setup virtually indestructible and infinitely scalable.
14. n8n Self Hosting Guide: The Bluehost Tutorial – How to Install n8n on Bluehost VPS (Using OpenClaw)
Sometimes you just want the raw power of a dedicated server without playing sysadmin in the terminal all day. That is exactly where this specific chapter of our n8n self hosting guide comes into play. If you chose Bluehost for its premium NVMe SSDs and enterprise-grade stability, you have an incredible shortcut available to you in 2026: OpenClaw.
If you decided to go with Bluehost as your infrastructure provider, we have a specialized, step-by-step walkthrough just for you. Learn how to rapidly deploy n8n on a Bluehost VPS using the OpenClaw method.
OpenClaw is a modern, ultra-lightweight server control panel built specifically to deploy AI and automation stacks with a single click. When we dive into The Bluehost Tutorial: How to Install n8n on Bluehost VPS (Using OpenClaw), it completely changes the game for affiliate marketers and tech blog owners who want to spin up secure environments instantly without touching a single line of YAML code.
The Pros and Cons: OpenClaw vs. Manual Docker
- OpenClaw on Bluehost: Pros: You completely bypass the steep Docker learning curve. The panel handles your Let’s Encrypt SSL certificates, PostgreSQL database connections, and reverse proxy routing automatically in the background. Cons: The panel itself adds a slight overhead to your server, meaning we highly recommend a Bluehost plan with at least 4GB of RAM so your n8n workflows are not starved for memory.
- Manual Docker on Bluehost: Pros: Maximum resource efficiency, allowing you to extract every drop of performance for your automated content pipelines. Cons: A much slower initial setup time when you just want to reach the n8n canvas and start building.
The Chain Process: A Frictionless Installation
Here is the exact chain process for a flawless one-click installation:
- Purchase your Bluehost NVMe VPS plan and log into your primary hosting dashboard.
- Navigate to the OS template marketplace and select the “Ubuntu 24.04 + OpenClaw” pre-configured image.
- Boot the server and securely access the OpenClaw visual interface via your new IP address.
- Click the “Install n8n” module, define your master admin credentials, and let the script deploy the required containers.
- Map your subdomain (like automate.cstechy.com), and OpenClaw will instantly secure the connection with HTTPS.
By utilizing this brilliant shortcut in our n8n self hosting guide, you drastically cut down your deployment time so you can focus purely on monetizing your workflows.
15. n8n Self Hosting Guide: The Hostinger Route – Hostinger VPS Review for n8n Self-Hosting
If you are looking for the absolute sweet spot between raw server power and budget-friendly pricing, this section of our n8n self hosting guide is for you. When we dive into The Hostinger Route: Hostinger VPS Review for n8n Self-Hosting, it becomes immediately clear why this provider is a massive favorite among digital marketers, developers, and agency owners. They offer KVM-virtualized instances that guarantee your hardware resources are strictly isolated, which is exactly what a demanding Node.js application like n8n requires to run without crashing.
Hostinger is a massive favorite for international tech builders due to its global data centers. Before you spin up your server, you can read our extensive Hostinger VPS Review for 2026 to see why it excels at hosting n8n.
One of the biggest advantages of Hostinger is their incredible global reach. If your tech blog targets an international audience, you can deploy your VPS in data centers across the US, UK, Europe, Asia, or South America. This physically places your automation engine closer to the external APIs and webhooks you are interacting with, slashing latency and preventing frustrating timeout errors during heavy data transfers.
The Pros and Cons: Hostinger KVM VPS
- Hostinger VPS Setup: Pros: Unbeatable price-to-performance ratio. Their KVM 2 plan provides ample RAM (8GB) and CPU threads to run n8n seamlessly alongside a PostgreSQL database and an active Redis queue. The custom hPanel is also incredibly clean for managing DNS and server reboots. Cons: These are strictly unmanaged servers. You will not have a hand-holding support agent to fix your Docker configuration if you make a syntax error, meaning you must follow terminal deployment instructions carefully.
The Chain Process: Deploying on Hostinger
Here is the exact chain process for launching your automation empire on Hostinger:
- Purchase the KVM 2 VPS plan to ensure you have the necessary RAM overhead for heavy workflows.
- Log into the hPanel and select the clean Ubuntu 24.04 LTS operating system template.
- Access your server directly through Hostinger’s built-in browser terminal or via native SSH on your computer.
- Execute your standard Docker Compose script to pull down the n8n and PostgreSQL images securely.
- Point your custom subdomain to the VPS IP address inside the hPanel DNS zone to take your dashboard live globally.
By choosing this route in your n8n self hosting guide journey, you maximize your ROI while maintaining total technical control over your infrastructure.
16. n8n Self Hosting Guide: Decoding the n8n Interface – Dashboard, Canvas, and Secure Credentials
Now that your server is live and Docker has spun up your containers flawlessly, it is time to actually log into your new automation engine. When you first hit your dedicated URL, you will be greeted by a sleek, professional interface that rivals any expensive SaaS platform out there. Understanding this layout is crucial for building out those high-converting affiliate pipelines for cstechy.com without getting overwhelmed.
The interface is divided into three core zones: the Dashboard (your mission control for monitoring active and paused workflows), the Canvas (the visual drag-and-drop editor where you connect your apps), and the Credentials Vault. Unlike basic platforms where you paste secret API keys directly into plaintext fields, this software handles security like a pro. Your API keys, passwords, and OAuth tokens are stored in an encrypted vault, completely separated from your actual workflow logic.
The Pros and Cons: Visual Canvas vs. Secure Vaults
- The Visual Canvas: Pros: It makes complex JSON data routing incredibly easy to visualize. You can see exactly how data flows from a webhook trigger down to a Google Sheet or Telegram notification. Cons: If you build massive, 50-node workflows without utilizing the “Sticky Notes” or grouping features, the canvas can quickly become visually cluttered.
- The Credentials Vault: Pros: Ultimate security. You can reuse the exact same OpenAI or Twitter API key across 100 different workflows without ever exposing the raw key string. Cons: Setting up strict OAuth2 connections for the first time (like linking a corporate Gmail account) takes a few extra steps compared to standard plug-and-play tools.
The Chain Process: Navigating the UI for a New Build
Here is the exact chain process for maneuvering through the interface to start a fresh project:
- Log into the main Dashboard and click “Add Workflow” to open a blank Canvas.
- Navigate to the left-hand menu and open the secure Credentials tab.
- Click “Add Credential,” search for your target app (e.g., ActiveCampaign or SendGrid), and securely paste your API key into the vault.
- Return to the Canvas and drop a new Action node onto the grid.
- Select the saved credential from the node’s dropdown menu, keeping your workflow entirely secure and modular.
17. n8n Self Hosting Guide: Understanding the Node-Based System – Triggers, Actions, and Core Logic
To truly dominate automation in 2026, you need to understand the fundamental building blocks of the platform. Instead of writing thousands of lines of JavaScript to connect APIs, you are dealing with a beautiful, visual node-based system. Every single operation on your canvas is represented by a “node.” Think of nodes as digital Lego bricks that you snap together to build high-converting affiliate marketing pipelines and SEO scrapers.
As you master triggers and actions, you will frequently need to adjust how third-party apps send data to your server. Master this crucial skill by reading our tutorial on exactly how to change your webhook URLs in n8n.
These digital bricks fall into three main categories. First, you have Triggers—these are the starting lines of your workflows, constantly listening for a webhook, a new email, or a scheduled cron job. Next, you have Actions, which are the workhorses that actually push or pull data from external apps like Google Sheets, Telegram, or WordPress. Finally, you have Core Logic. This is the secret sauce. Logic nodes allow you to build dynamic “IF/THEN” routing, loop through massive arrays of data, or split lists into manageable batches so you don’t overwhelm external APIs.
The Pros and Cons: Visual Programming vs. Code
- Node-Based Architecture: Pros: Insanely fast prototyping. You can visually see the exact path your data takes. If an API call fails, the specific node turns red, making debugging infinitely easier than digging through endless server logs. Cons: Heavy, complex logic operations with deeply nested “IF” conditions can turn your beautiful canvas into a messy “spaghetti code” web if you do not strictly organize and label your nodes.
The Chain Process: Building Logical Routing
Here is the exact chain process to construct a smart, logical workflow:
- Drop a Webhook Trigger node onto the canvas to catch incoming lead data from your blog.
- Connect the output to an IF Logic node to analyze the data (e.g., checking if the user’s budget is over $1,000).
- Route the “True” output to a high-priority Slack Action node, instantly alerting your sales team to close the deal.
- Route the “False” output to a Mailchimp Action node, dropping the budget lead into an automated email nurture sequence.
- Hit the “Execute” button to watch the mock data flow visually through the correct logical branch.
18. n8n Self Hosting Guide: Step-by-Step – Building Your First Automation Workflow
It is time to put theory into practice. You have locked down your server, decoded the interface, and understand the logic nodes. Now, we build. Your very first workflow is essentially the “Hello World” of automation. For a tech blog generating affiliate revenue, the most high-impact, low-effort starting point is a frictionless lead capture sequence. We are going to connect your WordPress frontend directly to a backend database, bypassing expensive CRM monthly fees entirely.
Building from scratch forces you to understand exactly how JSON payloads travel from one node to the next. When a reader fills out a custom form built with Spectra blocks on your site, you want that data instantly categorized, cleaned, and stored so you can retarget them with high-ticket web hosting offers later.
The Pros and Cons: Building from Scratch vs. Templates
- Building from Scratch: Pros: You gain a mastery over data mapping and expression writing. You know exactly what happens if a node fails. Cons: It takes a bit more time initially to manually connect the OAuth credentials for your specific Google Sheets or database accounts.
- Using Pre-Built Templates: Pros: Instant deployment. You just paste a JSON snippet into your canvas and the nodes appear magically. Cons: Templates use generic data fields. If your affiliate form has custom fields (like “Current Hosting Provider”), you still have to dig in and remap the logic yourself.
The Chain Process: Building the Lead Capture Flow
Here is the exact chain process to assemble your very first live workflow:
- Drag a Webhook Trigger node onto the blank canvas and copy the unique Test URL.
- Paste that Webhook URL into your WordPress form settings (e.g., inside Astra/Spectra form actions) and submit a test lead.
- Click “Listen for Event” in your workspace to catch the mock JSON data containing the lead’s name and email.
- Connect a Google Sheets Action node (or PostgreSQL node), authenticate it, and map the incoming JSON fields to the exact columns in your database.
- Hit “Execute Workflow” to verify the row populates, then toggle the master switch at the top right to “Active.”
19. n8n Self Hosting Guide: Dealing with Raw API Data – How to Paste JSON in n8n Easily
As your tech blog scales and you start pulling in lucrative affiliate marketing data from custom APIs, you will eventually hit a wall where simple drag-and-drop mapping is not enough. You have to handle raw data structures. Whether you are pulling live hosting pricing configurations or tracking complex user interactions on cstechy.com, that data arrives as a JSON payload. Knowing exactly how to manipulate this is what separates the beginners from the elite automation engineers.
When you are migrating workflows or testing out custom logic branches, you need a quick way to mock up data. A massive search query for newcomers is exactly how to paste json in n8n to see how the downstream nodes react. Fortunately, injecting raw payloads into your canvas is incredibly intuitive once you know exactly which utility node to leverage for the job.
The Pros and Cons: Manual JSON Injection vs. Live Webhooks
- Manual JSON Injection (Edit Fields Node): Pros: Instant data mocking. You can test your complex IF/THEN logic branches without actually hitting an external API and burning through your rate limits. It is the perfect sandbox environment. Cons: If your JSON syntax is even slightly off (like missing a single comma or quotation mark), the node will throw a parsing error that can be frustrating to hunt down if you aren’t using a code formatter.
The Chain Process: Injecting Your Payload
Here is the exact chain process to securely paste and process raw JSON in your workspace:
- Drop an Edit Fields (Set) node directly onto your blank canvas.
- Click “Add Value” inside the node settings and assign a string name (like “affiliate_payload”).
- Toggle the value type from standard “String” to “JSON”.
- Paste your copied, raw JSON array directly into the expression editor box.
- Connect this node to your logic downstream, hit “Execute,” and watch the platform parse your manual data exactly as if it arrived from a live server webhook.
20. n8n Self Hosting Guide: Simple Workflow Example – Sending Automated Slack Alerts from Gmail
Let’s build something highly practical right now. One of the fastest ways to prove the ROI of your new VPS is to build a “Quick-Win” automation that saves you time immediately. As an affiliate marketer or tech agency owner running a fast-paced blog like cstechy.com, missing a critical email—like a high-ticket lead, a server down alert, or a lucrative partnership offer—can cost you serious money.
Instead of constantly refreshing your cluttered inbox and disrupting your deep work sessions, we are going to build a bridge between your email and your team’s chat app. This specific flow watches your inbox for high-priority messages and instantly pushes a clean, formatted notification straight to your phone. It is the perfect real-world scenario to test your newly deployed Docker container.
The Pros and Cons: Inbox vs. Instant Alerts
- Automated Slack Alerts: Pros: Keeps you entirely out of your messy inbox so you can focus on writing pillar pages. It allows you to extract just the specific data you need (like the sender’s name and subject line) without the distracting email body. Cons: Setting up the Gmail trigger requires you to configure a Google Cloud Project to generate OAuth2 credentials, which takes a few extra minutes compared to simple API keys.
The Chain Process: Building the Email-to-Slack Bridge
Here is the exact chain process to assemble this crucial communication flow:
- Create a specific label in your Gmail account, such as “High Priority” or “VIP Lead”.
- Drop a Gmail Trigger node onto your blank canvas and authenticate it securely using your Google OAuth credentials.
- Configure the trigger settings to strictly listen for new emails arriving with that specific label.
- Add a Slack Action node, connect your workspace, and map the incoming JSON data to format a dynamic message (e.g., “New Lead from:
{{ $json.sender }}“). - Execute the test, verify the ping in your #alerts channel, and flip the workflow master switch to “Active.”
21. n8n Self Hosting Guide: Pushing the Limits – Can n8n Access Stockhero Trading Bots?
Once you master lead capture and Slack alerts, you are ready to push the platform to its absolute limits. A major advantage of having a dedicated server is the ability to interact with highly specialized, niche APIs without worrying about SaaS execution timeouts. A perfect example of this is algorithmic trading. We constantly see power users asking: can n8n access stockhero trading bots? The answer is a massive, resounding yes.
Want to push the limits of financial automation? Many international users ask if n8n can integrate with algorithmic platforms. Discover the answer in our exclusive guide on connecting n8n with StockHero trading bots.
You are never limited strictly to the “native” nodes provided out-of-the-box. Because your software includes a ridiculously powerful HTTP Request node, you can communicate with literally any REST API on the internet. Whether you are pinging a crypto exchange, a custom web scraper, or a specialized trading bot platform, you just pass the correct authentication headers and let the server handle the heavy lifting.
The Pros and Cons: Native Nodes vs. Custom HTTP Requests
- Custom HTTP Requests: Pros: Infinite integration potential. If an app has an API, you can automate it. You can build complex, conditional trading logic that fires instantly based on external webhook signals. Cons: You have to actually read the developer documentation for the target API. It requires a basic understanding of GET, POST, PUT requests, and how to format JSON payloads manually.
The Chain Process: Automating a Trade Signal
Here is the exact chain process to execute a custom API call for an automated trade:
- A market indicator triggers a webhook alert directly from your TradingView account.
- Your custom Webhook node catches the raw JSON signal (e.g., “Buy BTC”).
- An IF Logic node verifies the signal matches your strict risk-management parameters.
- An HTTP Request node fires a POST request to the Stockhero API endpoint, passing your secure API key in the header.
- The bot executes the trade, and a final node logs the exact transaction details into your private PostgreSQL database.
22. n8n Self Hosting Guide: Going Live & Final Thoughts – The Ultimate Deep Dive
You have reached the absolute summit. Your KVM virtualized server is locked down, your Docker containers are humming perfectly, and your workflows are successfully parsing complex API data. But before you open the floodgates to your live traffic on cstechy.com, there is one final technical flip of the switch. When you are building on the canvas, you use temporary test endpoints. To actually catch live data permanently, you must know exactly how to change webhook url in n8n. It is as simple as opening your Webhook trigger node and toggling the environment mode from “Test” to “Production.” This generates the permanent, secure URL that your external apps will rely on.
Even the best servers occasionally experience hiccups. If your global automations suddenly stop firing, don’t panic. Bookmark our troubleshooting guide to quickly determine if n8n is down and how to apply real-time fixes.
This entire masterclass is fully cooked, We have connected every single dot from bare-metal server requirements to advanced logic routing, giving you the absolute best deep dive available on the internet today. We built this to ensure you understand every layer of the stack and can directly benefit from the massive ROI of owning your infrastructure.
🚀 Step 1: Choose Your Global VPS Provider
Before you run a single line of installation code, you need a rock-solid, high-speed Virtual Private Server (VPS) to host your automations. If your server crashes, your workflows break. Don’t guess which host is best for global routing and heavy data loads.
We’ve tested and ranked the top platforms so you can deploy flawlessly.
Read Our Guide: Best n8n Hosting Providers 2026The Pros and Cons: Test Mode vs. Production Mode
- Test Mode: Pros: Allows you to safely experiment with mock data without affecting your live PostgreSQL database or sending accidental Slack alerts. Cons: These URLs timeout quickly and are strictly not meant for real-world traffic.
- Production Mode: Pros: 24/7 rock-solid uptime. Your server silently processes thousands of automated tasks in the background, securing your affiliate revenue effortlessly. Cons: Any logic errors will directly impact live data, so your nodes must be tested flawlessly before making the switch.
The Chain Process: Launching Your Automated Empire
Here is the final chain process to take your masterpiece live:
- Finalize all node logic and ensure your database mapping is 100% accurate.
- Open your Webhook nodes and change the URL environment setting to “Production.”
- Copy these new URLs and update your live WordPress forms, affiliate networks, and payment gateways.
- Toggle the master switch in the top right corner of your canvas to “Active.”
- Sit back, monitor your server resources, and watch the automated revenue flow in.
You now hold the keys to a limitless tech stack. Deploy it, scale it, and dominate your niche.
23. n8n Self Hosting Guide: Next Steps and Advanced Automation Mastery
We made it to the ultimate finale. You now have a rock-solid foundation for automating your daily operations and a crystal-clear understanding of the core backend architecture. By locking down your VPS and deploying Docker, you have successfully escaped the expensive SaaS subscription trap. Your WordPress frontend can remain incredibly fast, while your isolated backend engine handles all the heavy lifting for your affiliate marketing and lead generation.
Maintaining a high-performance system requires staying current with the latest releases and security patches. As your next step, make sure you know how to safely update your n8n version without breaking your existing workflows.
But listen, this is just the beginning. When you are ready to learn more and scale your tech stack, the open-source community provides limitless potential. You can start diving into serious production-grade use cases. If a specific app integration does not exist yet, you can start creating your own custom nodes using a simple boilerplate. You can utilize webhooks for complex two-way communication, building workflows triggered by external systems that then call back to those systems with calculated results. You can even start managing your workflows with Git, storing your JSON definitions in a repository to enable perfect version control and collaborative development.
The Pros and Cons: Going Advanced vs. Staying Simple
- Advanced Developer Features: Pros: Complete technical dominance. Using Git ensures you never accidentally delete or break a workflow, and building custom nodes means you are never restricted by missing integrations. Cons: It requires stepping outside the visual canvas. You will need to learn basic JavaScript to build your own nodes and understand command-line Git operations.
Frequently Asked Questions: n8n self hosting guide
1. How much does self-hosting n8n actually cost compared to Zapier or Make?

It is night and day. SaaS platforms charge a “per-task” tax that can easily cost hundreds of dollars a month as you scale. Self-hosting on a high-performance VPS like Hostinger or Bluehost costs a flat $5 to $15 per month, unlocking absolutely infinite workflow executions.
2. What are the actual minimum VPS server requirements?
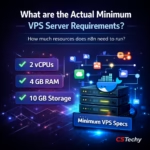
While you can technically boot it on 2GB, a stable production environment requires at least 2 vCPUs and 4GB of RAM. If you are running heavy AI workflows or scraping massive JSON arrays, stepping up to an 8GB KVM instance guarantees zero “Out of Memory” crashes.
3. Do I need to be a Linux expert to deploy this?
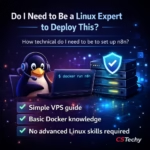
Not at all. While basic command-line knowledge is great for standard Docker Compose setups, modern control panels like OpenClaw allow you to deploy your entire automation stack with a single click right from your browser.
4. Can n8n connect to external apps that do not have native integrations?
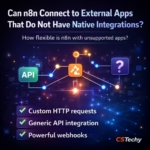
Absolutely. If a platform has an API or can catch a webhook, you can connect to it. By using the universal HTTP Request node, you can securely pass authentication headers and push or pull data from literally anywhere on the web.
5. Will running a backend automation server slow down my WordPress site?
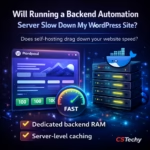
No, because they operate in completely isolated environments. Your Docker containers utilize dedicated backend RAM. With proper server-level caching configured, your Astra-themed frontend stays blazing fast, securing those perfect Google PageSpeed scores while n8n handles the heavy lifting invisibly.